
Rain gardens are perfect solutions if you want to prevent stormwater runoff from flooding and damaging your yard, driveway, and home’s foundation.
After heavy rain, water might pool in your yard due to poor soil drainage, often collecting pollutants from fertilizer, pet waste, pesticides and chemicals from the streets and gutters. The excess water can result in health hazards, costly repairs and a reduction in your home’s value.
Building a residential rain garden amplifies your home’s curb appeal while also reducing flooding on your property by redirecting water flow and absorbing stormwater runoff from the yard. Learn more about rain gardens and get a simple step-by-step guide to building and maintaining one for any yard type.

What Is a Rain Garden?
Rain gardens are used as tools to prevent flooding and runoff. Essentially, runoff is water from rainfall that flows across land and cannot absorb into the ground due to soil composition or concrete. A rain garden uses landscaping with plants, flowers and trees to absorb stormwater runoff after heavy precipitation.
Runoff—which often carries pollutants from sewers, trash, chemicals and pesticides—poses many health hazards for people and pets. In addition, stormwater runoff can flow into bodies of water, resulting in water pollution and stream bank erosion. This pollution can contaminate drinking water supplies—endangering humans—and natural aquatic habitats, affecting fish and other aquatic life.
Although there are various strategies to help mitigate runoff pollution, rain gardens offer a simple-to-build, cost-effective and low-maintenance approach to beautifying your lawn while helping to minimize ecological pollution. Building a rain garden can also be a fun DIY project for either the solo beginner or the whole family.
What makes a rain garden unique is that it’s built on the downside of a slope or in an area with a slight depression, making it efficient at soaking up stormwater runoff. It filters out sediment and 90% of the chemicals from runoffs.
A properly designed rain garden drains within 12 to 48 hours, preventing mosquitoes from breeding on your property. When it rains, the downward-sloped garden holds water and absorbs the runoff into its soil, grass, plants and mulch, where the water pollutants are filtered out and removed over time.
Rain Garden Benefits
Rain gardens are a type of green infrastructure system. The EPA defines a green infrastructure system as a natural landscape feature that uses plants, soil systems and other absorbent surfaces to facilitate the natural water cycle and absorb stormwater runoff. These functional yet beautiful gardens, also known as bioretention cells, benefit local communities and the environment. Depending on the project goals, you can also alter rain gardens to divert runoff from storm drains.
There are many reasons to build a rain garden. As previously mentioned, rain gardens are an inexpensive and easy way to absorb rainwater runoff. They also provide many environmental as well as cost and health benefits for local communities and residential areas. Due to the low startup and maintenance costs, rain gardens are an affordable way to help minimize local pollution in your community and reduce water damage to your property.
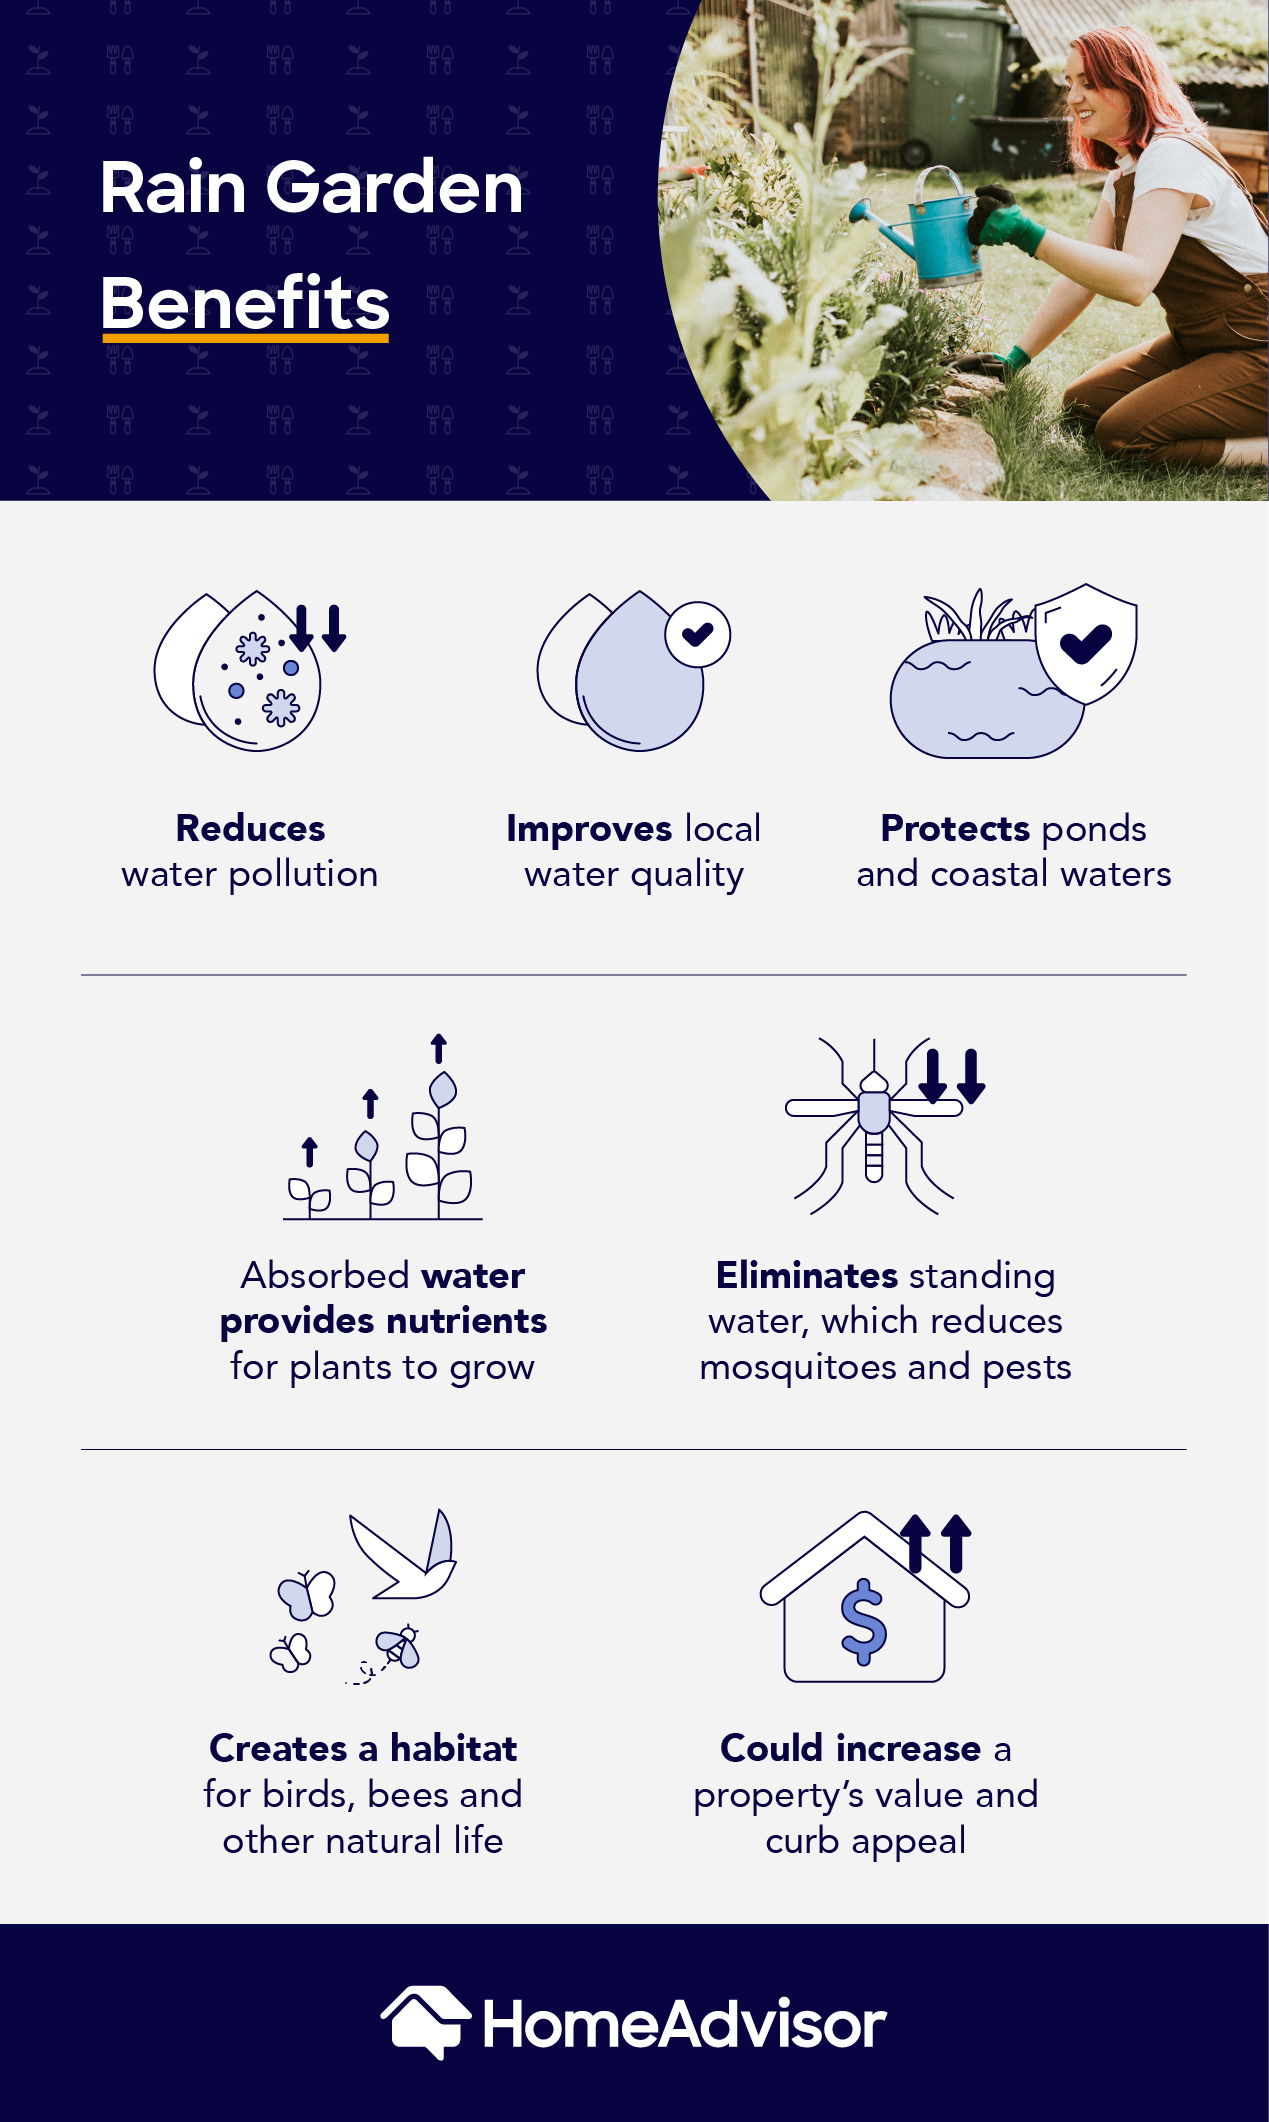
These gardens reduce water pollution and improve local water quality by absorbing and filtering stormwater runoff pollution. The absorbed groundwater provides nutrients for plants and improves soil health. The gardens also beautify neighborhoods, increasing property value and curb appeal.
Another benefit of rain gardens is that they protect ponds and coastal waters and remove standing water. They also reduce the potential for flooding on a property, which helps discourage mosquitoes and pests from breeding. Finally, rain gardens provide a habitat for birds, bees and other natural life.
Now that you know how a rain garden will benefit your yard, here’s how to build one.
Step 1: Gather Your Tools
Building a rain garden requires some specialized landscaping materials and tools. Having the right tools makes it possible to complete your rain garden while reducing the time and energy needed to do so. You’ll need the following supplies:
Landscaping Materials for a Rain Garden
- Topsoil
- Native perennials
- Native plants and grasses
- Mulch
- Soil amendments
- 1½ inch stone
- Three-quarter-inch crushed stone
Tools
- Shovel/soil rake
- Level
- Tape measure
- String and stakes
Step 2: Determine the Location of Your Rain Garden
Choosing the right location for your rain garden is critical to ensuring the garden works appropriately and effectively. To determine the site, first identify the total area and location of impervious surfaces or hard surfaces on your property, such as your home’s roof, driveway, sidewalks or patios. If you want the rain garden to primarily catch the drainage from your roof via the downspout, build it within 30 feet of the downspout.
Strategically place the rain garden in a location that will collect the maximum runoff from these identified surfaces. It is best to place a rain garden at a shallow depression or in a location with a downward slope. The location should be an area that receives direct and partial sunlight for the garden to mimic the natural water cycle.
When determining the location of a rain garden, you can mitigate costly property damage by avoiding a few critical mistakes. First, place the rain garden at least 10 feet away from your home. Building a rain garden too close to a property’s foundation can result in saturated soil, which can, in turn, damage a home’s foundation.
Second, before you start digging, be sure to contact your state’s utility clearance service line to check that your chosen site is not over underground utility lines and septic systems. You may want to hire a local landscaper to assist you.
Step 3: Identify the Soil Type
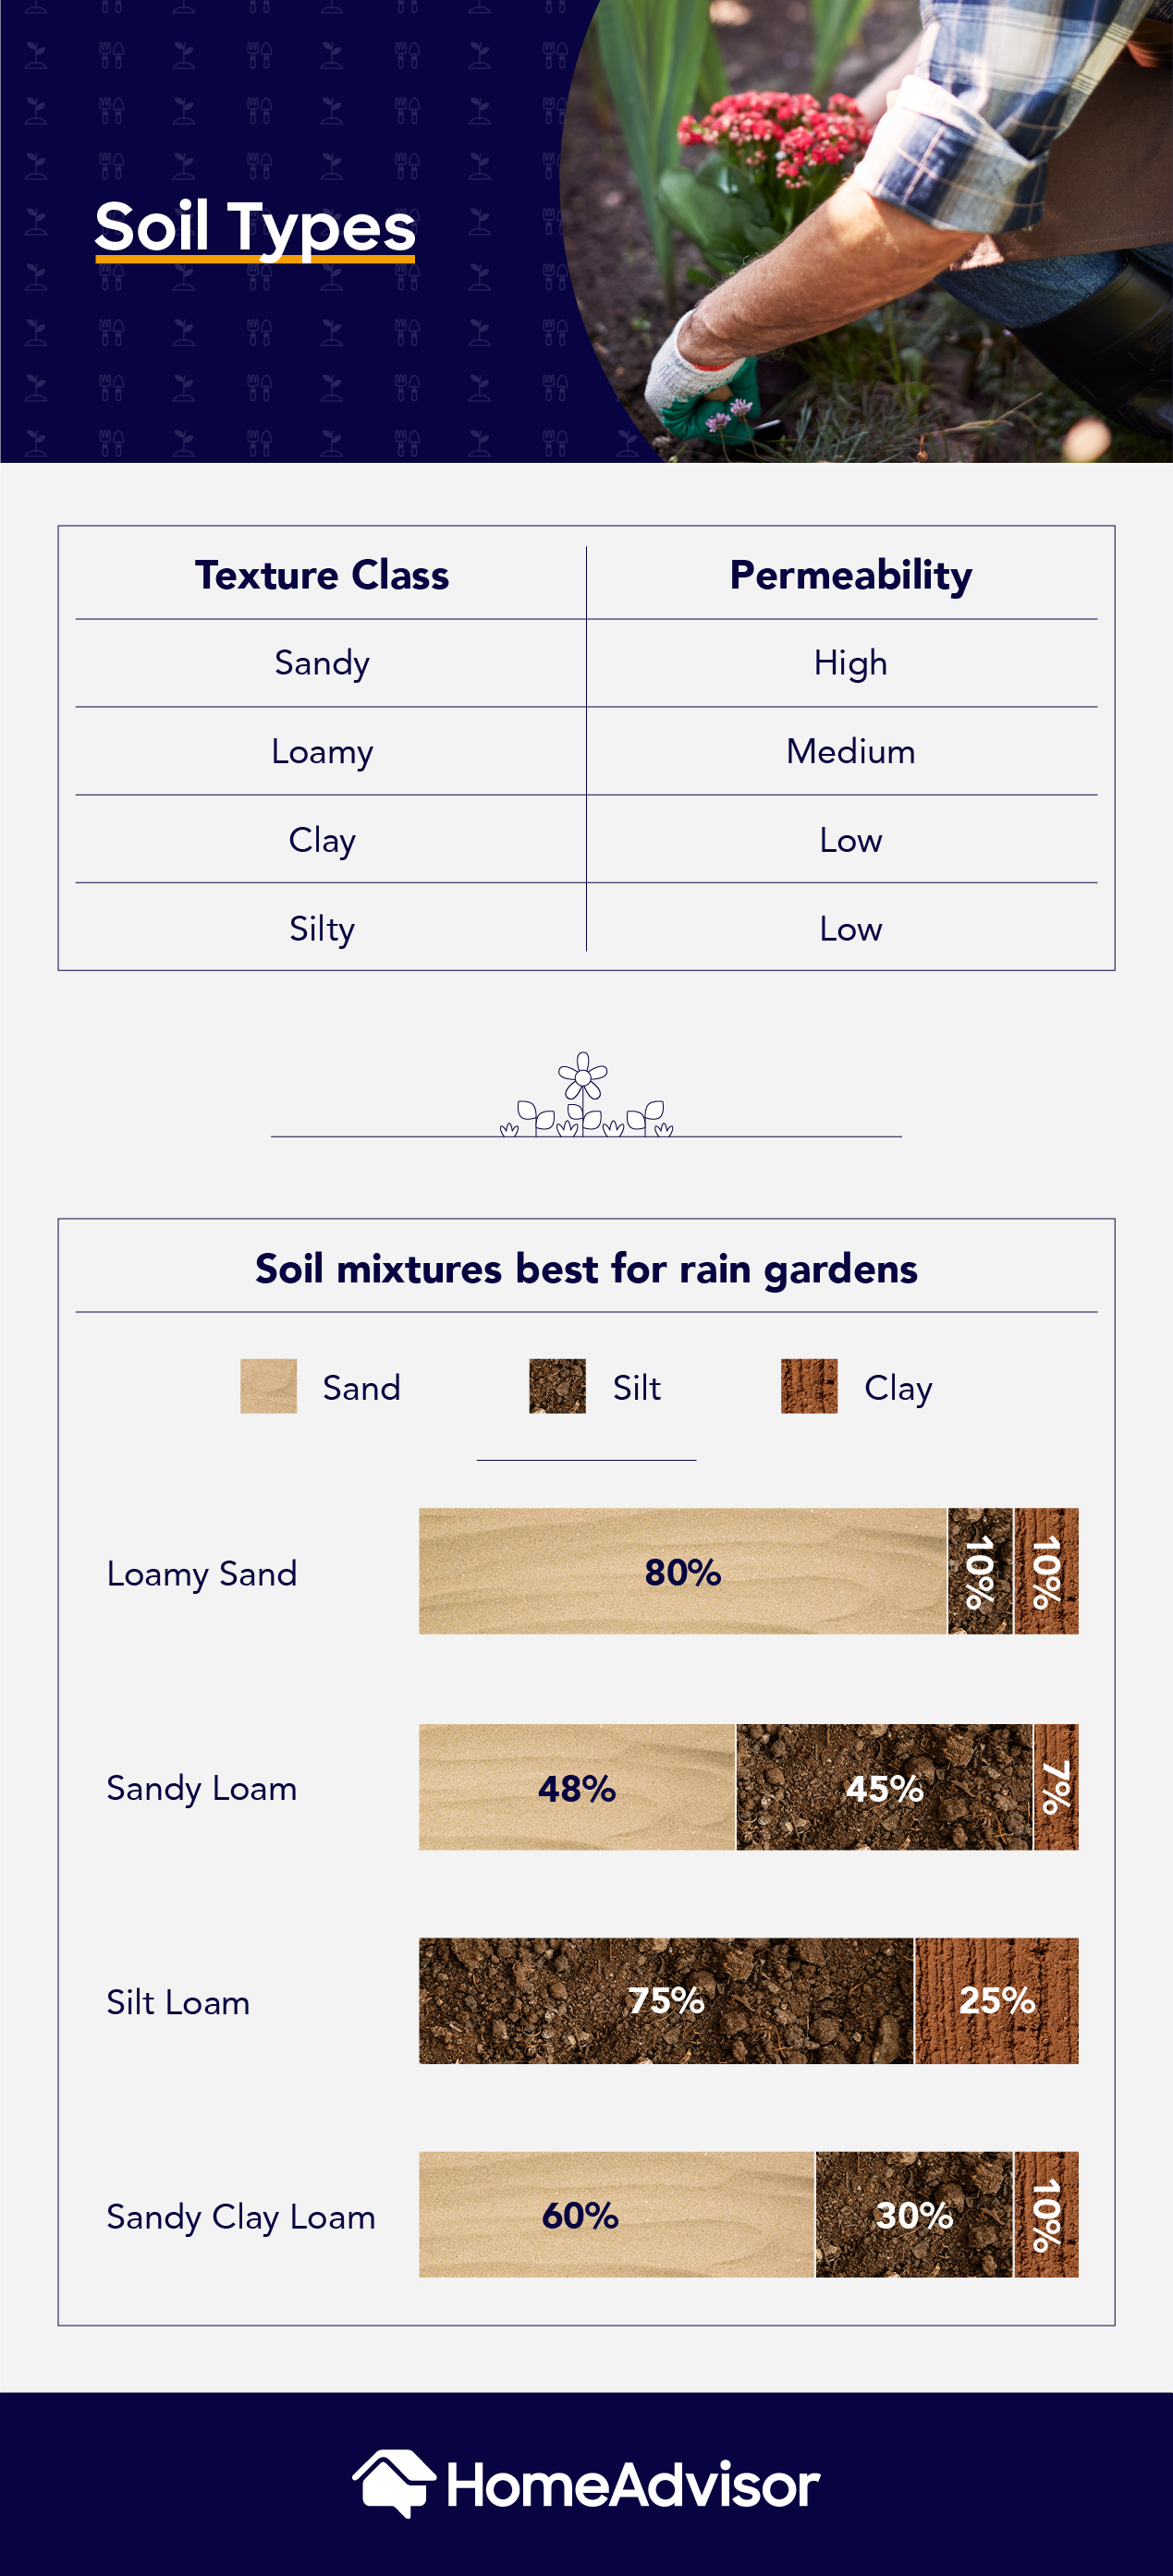
After choosing a location for your rain garden, you will need to confirm the soil type and whether the soil is categorized as sand, clay or loam. Testing your lawn’s soil can be done with a simple soil test (aka a texture feel test). It is important to complete this step because different soil types affect water drainage and impact how big or small the garden should be.
To complete the soil test, grab a handful of soil and add a few drops of water. Using your hands, roll the damp soil into a ball and then open your hand. If the soil feels gritty and immediately disintegrates, that means it is sandy. If the soil feels smooth and immediately crumbles, then it is loam. However, if it feels clumpy and retains its shape, that indicates clay.
Step 4: Decide on the Garden Size
Before considering a rain garden design, one of the main things to determine is how big you want your garden to be. Soil type affects runoff absorption. Your soil test results will help determine the best size for your rain garden.
After you determine the soil texture type using the simple soil test previously mentioned, you should map out the size of your garden. Rain gardens can be any size you want, but a typical residential rain garden is 100 to 300 square feet. However, even a garden less than 100 square feet can provide benefits.
Because clay soil drains water slowly, a rain garden built on this soil type needs to be large and should include soil amendments—extra materials added to the soil to improve it. Since sandy soil has a fast water absorption rate, a rain garden built on this soil type does not have to be large to work as effectively.
Loamy soil retains water well, and rain gardens built on this soil type can be of average size. Adding soil amendments mixed with compost and sand to the topsoil of loamy soil is also recommended.
If you want a rain garden that primarily catches drainage from your roof via the downspout, first calculate the length and width of your house in feet. Multiply the length and width to get your roof’s square footage. Then, determine the percentage of water you want to be drained via the downspout—multiply the portion by your roof’s square footage. For example, if you want 5% drained, then multiply .05 times your total roof area. This number will give you your rain garden’s ideal size (in square feet).
You should dig the garden between 4 to 8 inches deep, with the deepest part at the center. Use a soil rake to outline and mark the garden’s shape. Level the ground using a string and stake outline to determine the exact depth of the rain garden.
To determine the slope of your yard:
- Place a stake in the ground at the rain garden site’s upward slope or highest elevation and tie a string to the bottom of the stake at ground level.
- Put a second stake at the downward slope and run the string to it, tying it around this stake as well. Make sure the string is level.
- Next, measure the distance between both stakes in inches; then check the height between the string and the ground on the downhill stake.
- To calculate the lawn’s slope, divide this height (inches) by the distance between the stakes (inches) and multiply the result by 100.
If the slope is greater than 12%, hiring a local landscape designer to build the garden is best. If the incline is less than 4%, the rain garden should be 3 to 5 inches deep. If the slope is above 5%, it should be dug 6 to 8 inches deep.
Step 5: Start Digging
To make it easier to dig, especially if you have clay soil, use water to wet the land and wait overnight before you start digging. As you dig your garden, use the dirt you remove from the center to create the berm. A berm is a wall around all sides of the rain garden that is highest on the downhill side. The berm acts as a barrier that keeps runoff from spilling out while the soil is absorbing it. The berm should be 6 to 8 inches above ground level. After building the berm:
- Use a shovel or your foot to press the berm into a compact mass.
- After you compress the berm, cover it with mulch, grass or decorative stones and rocks to prevent erosion from the runoff.
- Fill the excavated garden hole with topsoil and amended soil such as sand and compost.
Step 6: Plant the Rain Garden
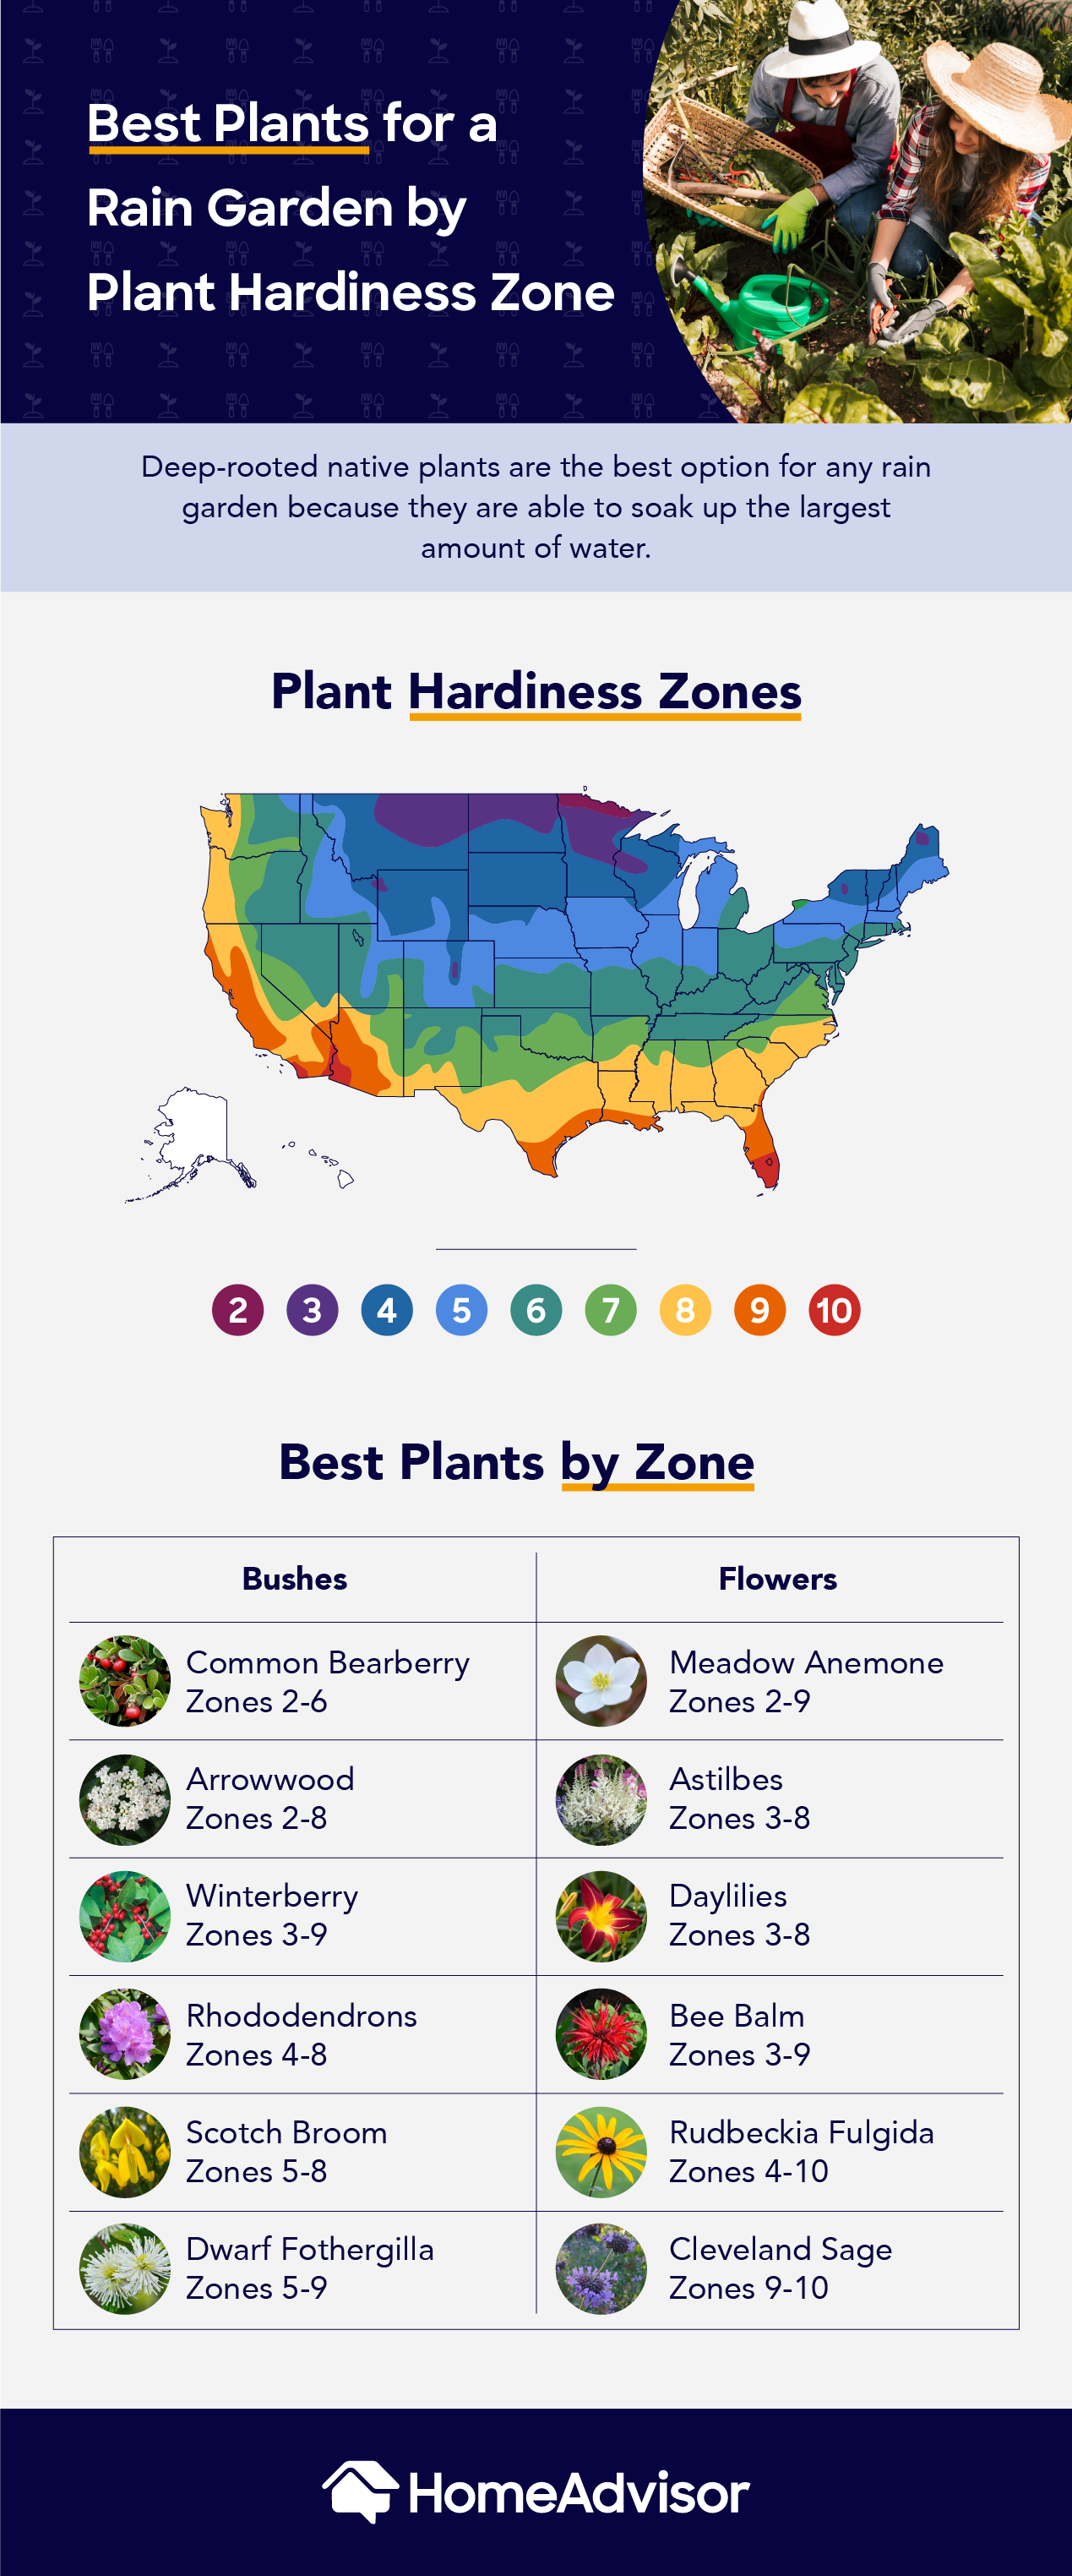
When planning the plant list for your rain garden, consider utility alongside style. Native plants (such as grass, wildflowers, perennials and shrubs) are ideal rain garden plants. They are low-maintenance vegetation with deep roots that absorb water better than exotic plants do. Don’t limit your plant list to only wetland species. Consider trees and shrubs with extensive root systems and high absorption levels.
An essential step to ensuring you plant suitable native species for your garden is using the USDA Plant Hardiness Zone Map to identify your USDA zone. Switchgrass, also called Panicum virgatum, is a native perennial grass that thrives in zones 3 to 9. It’s an ideal grass to plant in your garden due to its drought tolerance and ability to grow in moist soil. Another plant to consider is the common buttonbush (zones 5 through 9), which thrives in wetlands and high moisture soils.
After identifying the plants local to your zone, be sure to pick plants based on their infiltration rate and water tolerance. When arranging the plants, you should place drought-tolerant plants such as sedges (which have a high moisture absorption rate) at the center of your garden, which is often the lowest part of the garden.
Place plants with the lowest water absorption rate at the garden’s edge. Make sure the plants are spaced according to the information listed on their labels. After planting, mulch the garden to keep the soil moist and prevent weeds from sprouting. Also, place decorative stones around your garden to help improve the appearance and reduce erosion from water.
Step 7: Maintain the Garden
Fortunately, rain gardens using native plants are low-maintenance. To keep up with your garden, make sure to weed and prune the garden consistently. For the first two years, regularly water the newly transplanted plants until their root systems are established. Aim to supply an inch of water each week. Adding fertilizer to your garden is not necessary for native plants to grow. After the first two years, maintenance is minimal since regular watering is no longer required.
Rain gardens work all year round, even during heavy winters and snowfall. If you’ve planted native grasses in your garden, they tend to be hardy and should survive through the winter. Also, if you’ve planted native perennial wildflowers, they’ll typically die off in the winter but reemerge in the spring. During the fall, you should prune woody shrubs and dead branches. An inch of organic material mulch should be layered onto the garden to protect the soil and moisture during the winter.
In early spring, prune summer-flowering plants and shrubs. Dead plants should be cut from at least a couple of inches above the ground. Also, you should add a fresh layer of mulch to the garden to help suppress weeds. During spring, summer and winter, monitor your rain garden and regularly pull weeds.
During the first two years, you should remove weeds weekly to prevent invasive plants from overtaking the garden. After the native species in your garden have been established, they will grow and crowd out the weeds, reducing the amount and frequency of weeding required.
Why You Should Consider a Rain Garden
A residential rain garden supports the environment by reducing pollution from stormwater runoff. It can amplify a home’s curb appeal while also reducing flooding and water damage to your property. In addition to being a cost-effective way to reduce runoff, rain gardens are simple to build and require little maintenance. These features make them an ideal solution for people who want to improve the look of their lawn while also doing their part to help the environment and their local community.
 Dog Houses
  Outdoor Rooms: Enhance Your Outdoor Living
  Garden Fountains: Making Mother Nature Come Home
  Dry Stack Stone Walls Create a Rustic Look for Your Yard or Garden
  Checklist: Spring Gardening Tips

Are You Familiar With This Topic? Share Your Experience.