This is the second guide in a three-part series on how to build an attached deck. The last guide gave an overview of the planning and design process. Now we’ll get into installing the 4×4 posts and framework, including the ledger board, beams and rim joists.
This guide assumes you have a good working knowledge of a deck’s anatomy. This series doesn’t deal with covered porches or floating structures, though the latter is similar. Make sure to check with your local building enforcement office for code requirements – this can change how you design and install from what’s listed here.
On This Page:
- Designing & Planning Framing
- Brackets, Anchors & Materials Needed
- Step #2: Installing Footings & Posts
- Step #3: Attaching Ledger Board
- Step #4: Building the Frame
- Next Steps: Laying Boards & Building Railings and Steps
- DIY vs. Framing with a Pro
Designing & Planning Deck Framing
Local code and your home and yard layout will have the largest impact on framing design. Each design is going to be unique to your needs. Your joists will run perpendicular to your boards, so design your frame accordingly. There are two main ways to lay out framing – bean and joist or joist only.
Beam and Joist Framing
In this layout, attach beams to the top of the posts. The rim joists rest on top of the beams and attach to the ledger board. This is a popular setup since it’s recommended in most situations.
Only Joists
Common when vertical space is a consideration. In this configuration, doubled rim joists act as the beams. Install the floor or deck joists directly to the beams and ledger board with hangers rather than sitting them on top of the beams. This eliminates the width of the beams – anywhere from 6-12 inches. This style is common and best suited for ones installed near ground level.
Ready to start your Deck Construction?
Find ProsReturn to Top
Brackets, Anchors & Other Materials Needed
Always use outdoor rated materials that resist corrosion. Brackets and fasteners not recommended for deck building since they will fail prematurely. In addition to the tools listed in our How to Build a Deck Guide, which overviews design strategy and layout, you’ll need the following:
- Concrete Mix
- Concrete Forms
- Gravel
- Landscape Fabric
- Hurricane Ties
- Carriage Bolts
- Structural Screws
- Lag Screws
- Post anchors (j bolts)
- Post anchor brackets
- Joist Hangers
- Flashing
- Waterproofing Membrane
Step #2: Installing Foundation Footings & Posts
Once your deck has been laid out and the framing has been planned out, it’s time to begin installing posts. Call 811 before digging. Calling the dig line before beginning can prevent the possibility of cutting underground utilities. Always double check the location of your footings and posts.
- Remove the layout strings to get them out of your way while you dig. Don’t remove the batter boards, you’ll need these again.
- Dig footing holes. Make them at least six inches past the frost line or to your local building code. Make the hole slightly wider than the footing frames.
- Fill with gravel for drainage. Pour about six inches of gravel into the hole for drainage. Tamp it down with a 4×4 post.
- Lay out landscape paper. Only if desired or required by code. Cover it with your choice of landscaping material. This keeps weeds from growing under the deck.
- Place the concrete forms. Backfill around them then fill them with concrete. Make sure they are a couple inches above ground level.
- Pour Concrete. Fill the forms halfway with concrete. Use a stick or shovel to remove any air pockets. Fill the rest of the forms and remove any more air pockets.
- Note: Most professionals recommend using concrete footings with the wood deck posts attached to them with brackets above ground level to avoid post rot and premature failure. If you are burying the posts, use the same method with the posts placed in the concrete forms and skip the anchor bolts and brackets.
- Install the Ledger Board. Use the concrete drying time to install the ledger board. Having the ledger board installed makes it easier to adjust your post heights. The next section details this process. You can also install the ledger board prior to installing footings.
- Embed Anchor Bolts. Replace your strings on the batter boards and embed an anchor bolt or j-bolt in the concrete where the strings intersect. Anchor bolts should only be about one inch above the concrete. Install these after the concrete is just slightly set so they don’t move after placement.
- Attach the post brackets to the anchor bolts. Only after the cement is completely dry.
- Attach posts to brackets.
- Cut the posts to the correct height. Measure down from the door leading to the deck the width of the beams, joists, boards plus at least 3 inches (or to whatever your local code requires). If you have the ledger board installed, you can use it as a guide. Then snap a chalk line at this level along all the posts. Cut the posts at this line.
- Attach beam brackets. Attach these to the top of the posts for beam placement.
Ready to start your Deck Construction?
Find ProsReturn to Top
How to Properly Space Posts
Post spacing is going to depend on your design, local building codes, the size and length of your beams, and the size of your posts. Typical post size is a pressure treated 4×4. Post spacing should be even.
- Once you decide the distance, measure from the house for the first row of boards.
- Use added batter boards and string to mark rows of posts. Line up the string and double check measurements.
- Measure and mark the string for post placement.
- Mark the ground with marking paint.
How Deep to Dig in Posts
Dig posts or footings to local code requirements or at least six inches below the frost line. Always backfill under posts or footings with gravel for proper drainage. In warmer climates you can use premade footings. Check with your local code enforcement agency for specifics.
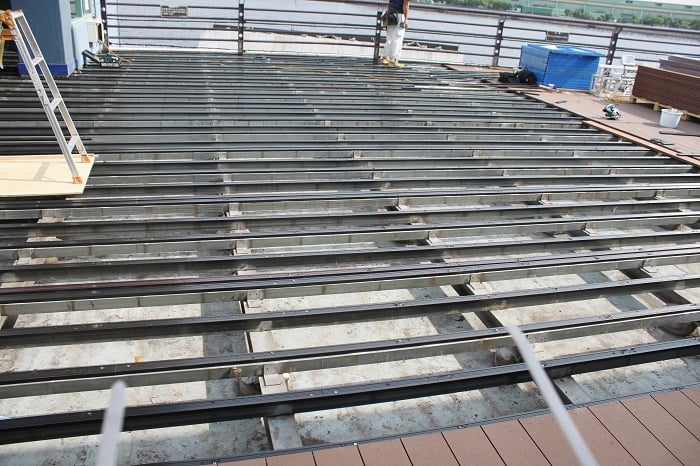
Wood vs. Steel & Other Footing Options
Most decks are wood, it’s simple to work with and easy to fix mistakes while being the more affordable choice. Steel posts and premade footings are also options. They cost up to twice as much but last longer and need less maintenance. Some composite decks use steel beams and joists. Find out more about the cost of deck materials.
Ready to start your Deck Construction?
Find ProsReturn to Top
Step #3: Attach the Ledger Board
There are two ways to do this. One method involves attaching the ledger board flush to the wall and flashing so water drains out over the ledger board. A better way, though more complex, is to attach the ledger board with a spaced gap for drainage. If you choose this method, you’ll need to waterproof the wall behind the ledger board. Consider subcontracting this part of the work to a professional to avoid costly repairs later.
Note: Ledger boards should be at least two inches plus the width of the deck boards below any doors. Some codes require even more room. This prevents moisture from rain and snow from getting under doors and into the walls of the house.
- Remove all necessary siding from your home.
- Determine the placement of the ledger board. Consult your deck plans. Placement will vary but should be in line with the beams or joists.
- Waterproof the wall. Use flashing and waterproofing wrap as needed.
- Attach the ledger board. Use lag bolts to the homes sill plate or framing based on your plans.
- Install waterproofing and flashing. Attach a self-adhering waterproofing membrane to the wall and over the top of the ledger board. Attach all necessary flashing over the top of the membrane. Don’t be afraid to go overboard. Poorly installed boards are one of the main causes of related water damage.
- Reinstall the siding.
Ready to start your Deck Construction?
Find ProsReturn to Top
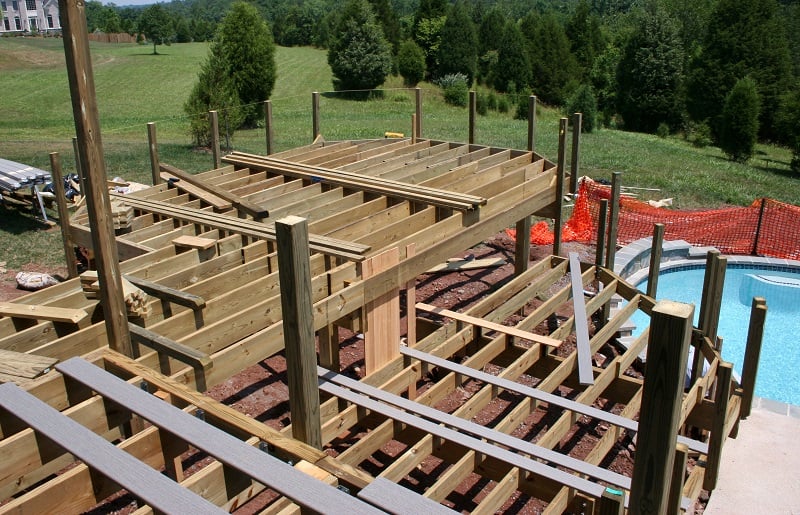
Step #4: Building the Frame with Support Beams and Joists
Beams
- Create the beams. Beams, sometimes called girders, should be two wood boards or steel posts of the proper thickness (consult your local building code and plans). Affix the boards together and use a waterproofing membrane (for wood) along the top edge to keep water from between the boards.
- Lay the beams on top of the posts in the beam brackets. Attach these to the top of the posts.
Attach Joists
- Lay in Place. You’ll attach them to the beams with hurricane ties after fitting them. Attach the rim joists to each other first.
- Attach. They’re designed to run around the rim and sit on top of the beams.
- Attach Deck Joists. Use structural screws and fasteners to attach these to the rim joists perpendicular to the deck board layout. Use structural screws and hangers.
- Install Bracing or Bridging. Bracing keeps the joists from warping as they dry and increases stability. It’s also useful for attaching railing posts.
- Trim and Attach the final Rim Joist. Trim the exterior edge by snapping a chalk line along the top of it. Then attach the final rim joist.
Attaching Deck Post to Rim Joist
If you’re using the method that uses rim joists as beams, you can attach the them directly to the posts instead. Locate your posts on the deck’s perimeter. You can use cleats or beam brackets for installing on top the posts. This is a common cost and space saving installation method.
Next Steps: Laying Decking, Building Railings & Installing Steps
For step-by-step instruction to complete your deck, find out how to build a deck railing.
Ready to start your Deck Construction?
Find ProsReturn to Top
DIY vs. Hiring a Deckbuilding Pro
This project is only for advanced DIYers with a good working knowledge of basic construction, experience and time. It can take weeks to complete. If that’s not you, call a professional for a consultation. Fully consider deck construction basics and various considerations of DIY vs. pro installation before deciding if this project is something you want to tackle yourself.
Pitfalls of DIY Framing
Local codes decide footings, post placement, and distances. Contact your local building code enforcement office for details. You’ll need a building permit and municipal inspections at specific points in the process. A deck contractor will take care of permits and inspections as part of the project cost.
 Understanding Deck Construction
  Cleaning Your Exteriors With a Pressure Washer
  Deck Maintenance Tips
  3 Benefits of Under-Deck Stain
  How to Find & Hire the Right Deck Carpenter or Contractor

I’m thinking about building a deck this summer. Thanks for sharing!